VLC弄ってみた 番外編 - Waifu2x-CaffeをLinux上でコンパイルする
さて、前回はなぜフィルタの話をしたのかというと、実はWaifu2xで動画の拡大をやろうと思っていたんですね。
Waifu2xってなに
Waifu2xは少し前にtwitterで話題になった画像拡大アルゴリズムで、ざっくり言うと、ニューラルネットワークを用いて、ある画像が「別の画像の縮小である」と仮定して、モデルを基に元の画像を推定することで高画質な拡大ができるそうです。
学習済みのモデルにはいくつか種類があるようですが、アニメタッチの画像などで特に力を発揮するようです。
もっと知りたい方は、この辺の記事とかを読んでいただけると分かりやすいかと思います。
Waifu2xをVLCに組み込みたい
それで、このWaifu2xですが、いくつかバージョンがあります。 最初にtwitterで話題になったのはこれで、こちらの論文を参考にしているようです。
ただ、luaで書かれていてあまり汎用性がないため、C++で書かれたwaifu2x-converter-cppや、高速化を目指して機械学習ライブラリCaffeやcuDNNを用いたwaifu2x-caffeなどが有志によって実装され、公開されています。
僕も実際に試してみましたが、やはりCaffe版が最速のようだったので、是非こいつをVLCに組み込みたいと思ったわけです。
ただ、こいつがVisual Studioで書かれていて、Windows向けなんですね。
僕が使っているのはUbuntuなので、頑張ってLinuxでコンパイルできないか…ということで、まずはCMakeでこいつをコンパイルすることにしました。
CMakeってなに
CMakeというのは、使うライブラリなどを書いておくとMakefileを自動で生成してくれるツールです。似たような用途では他にもautomakeというのがあって、VLCではこちらを使っています。
Makefile.amのamはautomakeの略ですね。
ですが、automakeは少し冗長な書き方になってしまうので、CMakeのほうがすっきりとかける傾向にあります。
この手のツールには他にもOMakeとかninjaとか、jsonで書けるgypとか色々ありますが、使ったことがあって一般的で一番手っ取り早そうだったのでCMakeにしました。
必要なもの
NVIDIAのサイトから、CUDA, cuDNNをダウンロード・インストールしておいてください。
対応GPUを搭載したマシンが必要になります。
書く
まずwaifu2x-caffeをcloneしてきます。
git clone https://github.com/lltcggie/waifu2x-caffe.git
git submodule update --init --recursive
mkdir cmake
ここにCMakeLists.txtを付け足しますが、その前にCMakeでは一般的にサポートされているOpenCV以外のライブラリを使いたい場合、自前でFind***.cmakeというファイルを用意する必要があります。こいつの役目は主にディレクトリを探してくることです。自分で書くのはめんどくさいので、他の人が書いたものを借りてきましょう。良い時代です。
まず、FindGlog.cmake, FindCUDA.cmakeというファイルが必要です。次のファイルをそれぞれcmake/FindGlog.cmake, cmake/FindCUDA.cmakeとして保存します。
そして、cuDNNをdetectするために、caffeのCuda.cmakeから、165行目〜を拝借します。これをcmake/FindcuDNN.cmakeとして保存します。
################################################################################################
# Short command for cuDNN detection. Believe it soon will be a part of CUDA toolkit distribution.
# That's why not FindcuDNN.cmake file, but just the macro
# Usage:
#   detect_cuDNN()
function(detect_cuDNN)
  set(CUDNN_ROOT "" CACHE PATH "CUDNN root folder")

  find_path(CUDNN_INCLUDE cudnn.h
            PATHS ${CUDNN_ROOT} $ENV{CUDNN_ROOT} ${CUDA_TOOLKIT_INCLUDE}
            DOC "Path to cuDNN include directory." )

  get_filename_component(__libpath_hist ${CUDA_CUDART_LIBRARY} PATH)
  find_library(CUDNN_LIBRARY NAMES libcudnn.so # libcudnn_static.a
                             PATHS ${CUDNN_ROOT} $ENV{CUDNN_ROOT} ${CUDNN_INCLUDE} ${__libpath_hist}
                             DOC "Path to cuDNN library.")

  if(CUDNN_INCLUDE AND CUDNN_LIBRARY)
    set(HAVE_CUDNN  TRUE PARENT_SCOPE)
    set(CUDNN_FOUND TRUE PARENT_SCOPE)

    mark_as_advanced(CUDNN_INCLUDE CUDNN_LIBRARY CUDNN_ROOT)
    message(STATUS "Found cuDNN (include: ${CUDNN_INCLUDE}, library: ${CUDNN_LIBRARY})")
  endif()
    message(STATUS "Found cuDNN (include: ${CUDNN_INCLUDE}, library: ${CUDNN_LIBRARY})")
endfunction()
そして、waifu2x-caffe/に次のCMakeLists.txtを保存します。
cuDNNをインストールしたディレクトリをexportしておきます。
export CUDNN_ROOT=/usr/lib/cuda/include
次のコマンドを実行し、コンパイルできることを確かめましょう。
mkdir build; cd build
cmake ..
make
著作権上微妙なFindcuDNN.cmake以外のファイルをgithubに上げてあります。
https://github.com/onishy/Waifu2x-Caffe-Linux.git
結果
waifu2x-caffeは無事にコンパイルできました。ただ、こいつをVLCに移植する段階で少し挫折してしまいました。
まず処理時間的にリアルタイム処理は難しかったので、適当に数フレームごとに適用する処理を書かなければいけなかったのが少し面倒だったというのがあります。
またautomakeでのライブラリのリンクなんかが面倒すぎて、あまり時間もなくなってきたのでやめてしまいました。ごめんなさい。。
VLC弄ってみた#3 - フィルタを追加する
第3回目の今回は、VLCのフィルタ機能について解説します。
VLCには色々な機能がありますが、その中でも1、2位を争うレベルで知られていない機能と言っても過言ではないのが、フィルタ機能です。
フィルタ機能とは?
普通に再生した動画は以下。
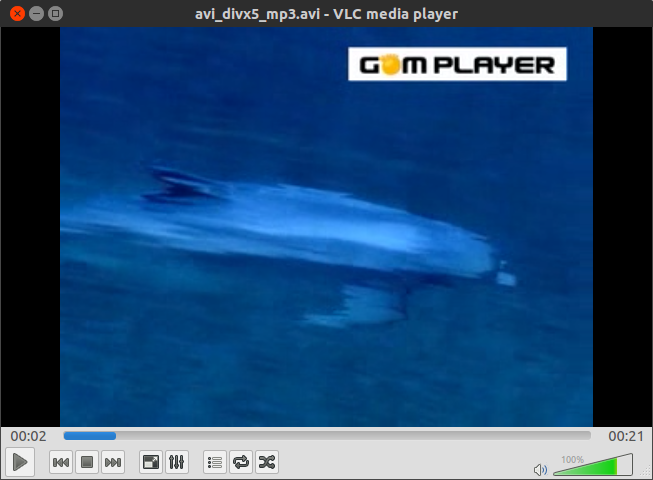
試しに、次のコマンドをつけてVLCを起動してみましょう。
vlc --video-filter rotate
このウィンドウで適当な動画を再生すると、次のような実行結果になります。
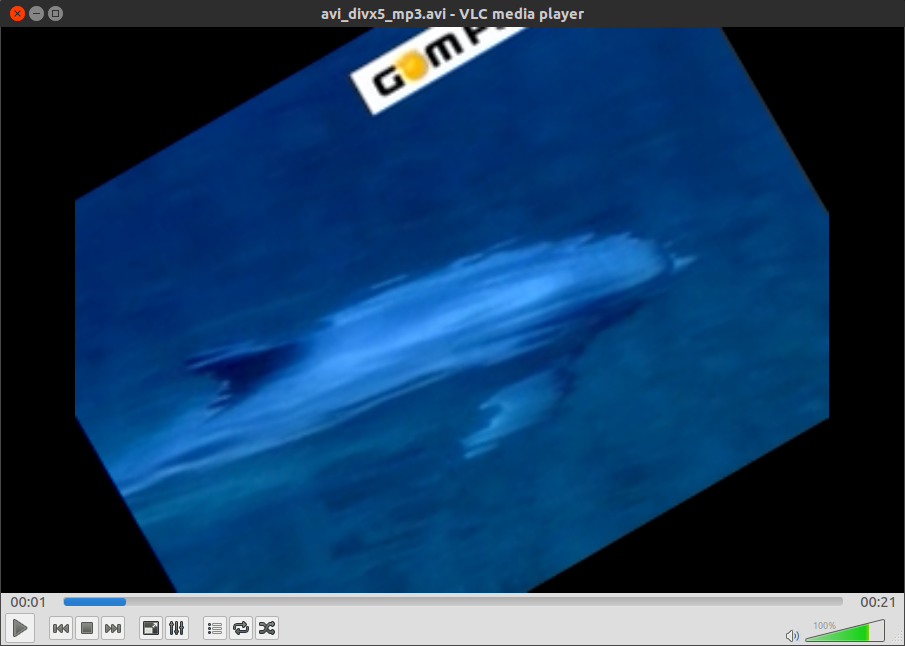
その名の通り、動画を45度回転させて再生する機能のようです。
一体どういう時に使うのか、サッパリ見当が付きません…
次に、このようなコマンドをつけて起動してみます。
vlc --video-filter ball
先ほど同様に動画を再生すると…?
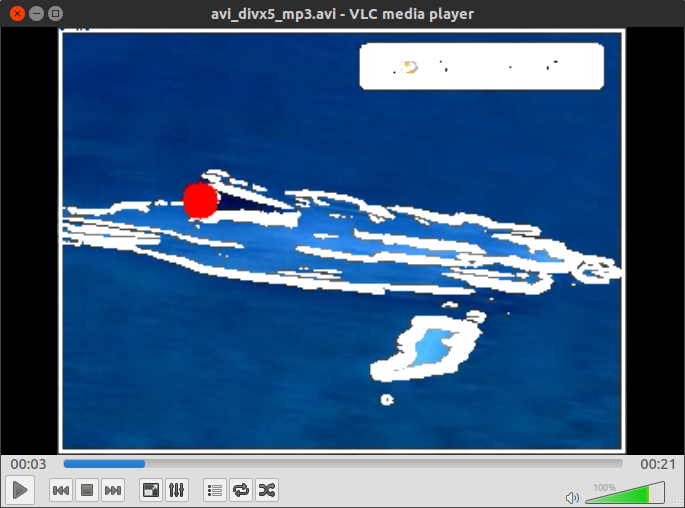
!?!?!?
どうやら、動画から輪郭を抽出して、それを壁にボールが跳ねる仕様っぽい…??
こんなものがVLCの正式版に入っているんですから奇妙です。
フィルタ機能の実装
され、これらの謎のフィルタですが、どこに実装されているかというと、modules/video_filterの中です。これらのファイル一つ一つ、その数58個!!!そしてその大半が実用性の見いだせないおもちゃフィルタです。暇人かよ。
psychedelicとかも割とマジキチで面白いです。結果は試してみてください。
さてフィルタですが、既存のフィルタを踏襲すれば、比較的簡単に実装することができます。
ここでは、ballフィルタをパクって、ボールの代わりに画像を表示できるようにします。
モジュールの登録
ball.cの122行目、vlc_module_begin()から始まる部分が、vlcのライブラリにフィルタをモジュールとして登録しています。
vlc_module_begin ()
    set_description( N_("Ball video filter") )
    set_shortname( N_( "Ball" ))
    set_help(BALL_HELP)
    set_capability( "video filter2", 0 )
    set_category( CAT_VIDEO )
    set_subcategory( SUBCAT_VIDEO_VFILTER )

    add_string( FILTER_PREFIX "color", "red",
                BALL_COLOR_TEXT, BALL_COLOR_TEXT, false )
    change_string_list( mode_list, mode_list_text )

    add_integer_with_range( FILTER_PREFIX "speed", 4, 1, 15,
                            BALL_SPEED_TEXT, BALL_SPEED_LONGTEXT, false )

    add_integer_with_range( FILTER_PREFIX "size", 10, 5, 30,
                            BALL_SIZE_TEXT, BALL_SIZE_LONGTEXT, false )

    add_integer_with_range( FILTER_PREFIX "gradient-threshold", 40, 1, 200,
                            GRAD_THRESH_TEXT, GRAD_THRESH_LONGTEXT, false )

    add_bool( FILTER_PREFIX "edge-visible", true,
              EDGE_VISIBLE_TEXT, EDGE_VISIBLE_LONGTEXT, true )

    add_shortcut( "ball" )
    set_callbacks( Create, Destroy )
vlc_module_end ()
ballフィルタに関する情報がずらずらと並べられています。まずはこれを適当に変更します。
vlc_module_begin ()
    set_description( N_("Hemi video filter") )
    set_shortname( N_( "Hemi" ))
    set_help(BALL_HELP)
    set_capability( "video filter2", 0 )
    set_category( CAT_VIDEO )
    set_subcategory( SUBCAT_VIDEO_VFILTER )

    add_string( FILTER_PREFIX "color", "red",
                BALL_COLOR_TEXT, BALL_COLOR_TEXT, false )
    change_string_list( mode_list, mode_list_text )

    add_integer_with_range( FILTER_PREFIX "speed", 4, 1, 15,
                            BALL_SPEED_TEXT, BALL_SPEED_LONGTEXT, false )

    add_integer_with_range( FILTER_PREFIX "size", 10, 5, 30,
                            BALL_SIZE_TEXT, BALL_SIZE_LONGTEXT, false )

    add_integer_with_range( FILTER_PREFIX "gradient-threshold", 40, 1, 200,
                            GRAD_THRESH_TEXT, GRAD_THRESH_LONGTEXT, false )

    add_bool( FILTER_PREFIX "edge-visible", true,
              EDGE_VISIBLE_TEXT, EDGE_VISIBLE_LONGTEXT, true )

    add_shortcut( "hemi" )
    set_callbacks( Create, Destroy )
vlc_module_end ()
hemiというのは、僕の中でhogeと同義語の単語です。あまり気にしないでください。
BMP画像の読み込み
画像を表示するので、まずはbmpを読み込む関数を作らなければいけません。VLCには画像系の関数は色々充実していそうなものですが、bmpに出力する関数はあっても、読み込む関数はないようです。
とりあえず動けばいいので、今回はアルファチャンネルなどは考慮しません。GIMPで40x40に縮小した正方形の画像をbmpに出力した、どーもくんのアイコンを用います。

なのでここは、検索すると出てくる中でも一番シンプルな実装をされている、物理のかぎしっぽさんのソースコードを拝借させて頂きます。
ただ、こちらのソースコードには少し読み込みのバグがあり、そのまま使うと数ピクセル分黒いピクセルが現れた後、RGBが入れ替わった画像が不思議な周期で現れるというおかしな挙動を示してしまいます。
少しデバッグをすると分かるのですが、これはヘッダを読み込んだ際にバッファを先送りしていないためなので、56行目あたりに2行だけソースコードを追加します。
//68bytes捨てる
char null_buf[128];
fread(null_buf, sizeof(unsigned char), 68, fp); //Throw away
これで読み込み関数はOKです。
描画と基底変換
次に、ボールの代わりにこの画像を描画します。
読み込まれた画像は2次元配列になっているので、大して難しくはありません。元々円が描画されていた部分(drawBall)を、次のように変更するだけです。
static void drawHemi( filter_sys_t *p_sys, picture_t *p_outpic )
{
    Image *img = Read_Bmp(hemi_filename);

    int x = p_sys->i_hemi_x;
    int y = p_sys->i_hemi_y;
    int size = p_sys->i_hemiSize;

    const int i_width = p_outpic->p[0].i_visible_pitch;
    const int i_height = p_outpic->p[0].i_visible_lines;

    for( int j = y - img->height/2; j < y + img->height/2; j++ )
    {
        bool b_skip = ( x - size ) % 2;
        int m_y = j - (y-img->height/2);
        for( int i = x - img->width/2; i < x + img->width/2; i++ )
        {
            /* Draw the pixel if it is inside the disk
               and check we don't write out the frame. */
            {
                int m_x = i - (x-img->width/2);
                ( *p_sys->drawingPixelFunction )( p_sys, p_outpic,
                                    get_color_func(img->data[m_y * img->width + m_x]).comp1,
                                    get_color_func(img->data[m_y * img->width + m_x]).comp2,
                                    get_color_func(img->data[m_y * img->width + m_x]).comp3,
                                    i, j, b_skip );
                b_skip = !b_skip;
            }
        }
    }
}
少しややこしいのは、VLCが必ずしもRGBで画像を描画するわけではないところです。
ball.cの冒頭、48行目付近を見てみます。
#define COLORS_RGB \
    p_filter->p_sys->colorList[RED].comp1 = 255; p_filter->p_sys->colorList[RED].comp2 = 0;        \
                                p_filter->p_sys->colorList[RED].comp3 = 0;        \
    p_filter->p_sys->colorList[GREEN].comp1 = 0; p_filter->p_sys->colorList[GREEN].comp2 = 255;    \
                               p_filter->p_sys->colorList[GREEN].comp3 = 0;       \
    p_filter->p_sys->colorList[BLUE].comp1 = 0; p_filter->p_sys->colorList[BLUE].comp2 = 0;        \
                               p_filter->p_sys->colorList[BLUE].comp3 = 255;      \
    p_filter->p_sys->colorList[WHITE].comp1 = 255; p_filter->p_sys->colorList[WHITE].comp2 = 255;  \
                                  p_filter->p_sys->colorList[WHITE].comp3 = 255;

#define COLORS_YUV \
    p_filter->p_sys->colorList[RED].comp1 = 82; p_filter->p_sys->colorList[RED].comp2 = 240;        \
                                p_filter->p_sys->colorList[RED].comp3 = 90;        \
    p_filter->p_sys->colorList[GREEN].comp1 = 145; p_filter->p_sys->colorList[GREEN].comp2 = 34;    \
                               p_filter->p_sys->colorList[GREEN].comp3 = 54 ;      \
    p_filter->p_sys->colorList[BLUE].comp1 = 41; p_filter->p_sys->colorList[BLUE].comp2 = 146;      \
                               p_filter->p_sys->colorList[BLUE].comp3 = 240;       \
    p_filter->p_sys->colorList[WHITE].comp1 = 255; p_filter->p_sys->colorList[WHITE].comp2 = 128;   \
                                  p_filter->p_sys->colorList[WHITE].comp3 = 128;
ここでYUVという文字列が出てきました。
YUV(Wikipedia)というのは、輝度信号Yと色差信号2つを用いて色を表現する方法です。
これを、231行目からのswitch文で次のように呼び出しています。
switch( p_filter->fmt_in.video.i_chroma )
{
    case VLC_CODEC_I420:
    case VLC_CODEC_J420:
        p_filter->p_sys->drawingPixelFunction = drawPixelI420;
        COLORS_YUV
        break;
    CASE_PACKED_YUV_422
        p_filter->p_sys->drawingPixelFunction = drawPixelPacked;
        COLORS_YUV
        GetPackedYuvOffsets( p_filter->fmt_in.video.i_chroma,
                             &p_filter->p_sys->i_y_offset,
                             &p_filter->p_sys->i_u_offset,
                             &p_filter->p_sys->i_v_offset );
        break;
    case VLC_CODEC_RGB24:
        p_filter->p_sys->drawingPixelFunction = drawPixelRGB24;
        COLORS_RGB
        break;
    default:
        msg_Err( p_filter, "Unsupported input chroma (%4.4s)",
                 (char*)&(p_filter->fmt_in.video.i_chroma) );
        return VLC_EGENERIC;
}
コーデックによって、RGBを用いるか、YUVを用いるかを決めています。
そして、この処理結果を395行目で次のように利用しています。
( *p_sys->drawingPixelFunction )( p_sys, p_outpic,
                    p_sys->colorList[ p_sys->ballColor ].comp1,
                    p_sys->colorList[ p_sys->ballColor ].comp2,
                    p_sys->colorList[ p_sys->ballColor ].comp3,
                    i, j, b_skip );
見ての通り、特定の色のみをサポートしていて(ボールの色は単色で良い)、かつ単色のためよほど変な色でない限り問題ありません。
BMPから取得した色はRGBであるため、これをYUV空間の値に変換する必要があります。この辺によると、次の変換公式を使うことができます。
Y = 0.299R + 0.587G + 0.114B
U = -0.169R - 0.331G + 0.500B
V = 0.500R - 0.419G - 0.081BY = (0.257 * R) + (0.504 * G) + (0.098 * B) + 16
Cr = V = (0.439 * R) - (0.368 * G) - (0.071 * B) + 128
Cb = U = -(0.148 * R) - (0.291 * G) + (0.439 * B) + 128
これを基に、先ほどのマクロがあった部分を次のように書き換えます。
typedef struct{
    unsigned char b;
    unsigned char g;
    unsigned char r;
}Rgb;

typedef struct{
    char comp1;
    char comp2;
    char comp3;
}color_t;

color_t (*get_color_func)(Rgb color);

color_t get_rgb_color(Rgb color) {
    color_t c = {color.b, color.g, color.r};
    return c;
}

// Y =  0.299R + 0.587G + 0.114B
// U = -0.169R - 0.331G + 0.500B
// V =  0.500R - 0.419G - 0.081B

// Y  =      (0.257 * R) + (0.504 * G) + (0.098 * B) + 16
// Cr = V =  (0.439 * R) - (0.368 * G) - (0.071 * B) + 128
// Cb = U = -(0.148 * R) - (0.291 * G) + (0.439 * B) + 128

color_t get_yuv_color(Rgb color) {
    color_t c = {
        (int)( 0.257 * color.r + 0.504 * color.g + 0.098 * color.b)+16,
        (int)( 0.439 * color.r - 0.368 * color.g - 0.071 * color.b)+128,
        (int)(-0.148 * color.r - 0.291 * color.g + 0.439 * color.b)+128};

    return c;
}

#define COLORS_RGB \
    p_filter->p_sys->colorList[RED].comp1 = 255; p_filter->p_sys->colorList[RED].comp2 = 0;        \
                                p_filter->p_sys->colorList[RED].comp3 = 0;        \
    p_filter->p_sys->colorList[GREEN].comp1 = 0; p_filter->p_sys->colorList[GREEN].comp2 = 255;    \
                               p_filter->p_sys->colorList[GREEN].comp3 = 0;       \
    p_filter->p_sys->colorList[BLUE].comp1 = 0; p_filter->p_sys->colorList[BLUE].comp2 = 0;        \
                               p_filter->p_sys->colorList[BLUE].comp3 = 255;      \
    p_filter->p_sys->colorList[WHITE].comp1 = 255; p_filter->p_sys->colorList[WHITE].comp2 = 255;  \
                                  p_filter->p_sys->colorList[WHITE].comp3 = 255;   \
    get_color_func = get_rgb_color; printf("using rgb mode\n");

#define COLORS_YUV \
    p_filter->p_sys->colorList[RED].comp1 = 82; p_filter->p_sys->colorList[RED].comp2 = 240;        \
                                p_filter->p_sys->colorList[RED].comp3 = 90;        \
    p_filter->p_sys->colorList[GREEN].comp1 = 145; p_filter->p_sys->colorList[GREEN].comp2 = 34;    \
                               p_filter->p_sys->colorList[GREEN].comp3 = 54 ;      \
    p_filter->p_sys->colorList[BLUE].comp1 = 41; p_filter->p_sys->colorList[BLUE].comp2 = 146;      \
                               p_filter->p_sys->colorList[BLUE].comp3 = 240;       \
    p_filter->p_sys->colorList[WHITE].comp1 = 255; p_filter->p_sys->colorList[WHITE].comp2 = 128;   \
                                  p_filter->p_sys->colorList[WHITE].comp3 = 128;   \
    get_color_func = get_yuv_color; printf("using yuv mode\n");
こうすることで、get_color_funcが、色情報によって正しい色を返してくれるため、画像をYUVに変換することができました。
コード全体像:
そして最後に、Makefileをいじっておきます。modules/video_filter/Makefile.amの中に、次の段落を追加します。
libhemi_plugin_la_SOURCES = $(SOURCES_hemi)
libhemi_plugin_la_CPPFLAGS = $(AM_CPPFLAGS) $(CPPFLAGS_hemi)    -DMODULE_NAME_IS_hemi
libhemi_plugin_la_CFLAGS = $(AM_CFLAGS) $(CFLAGS_hemi)
libhemi_plugin_la_CXXFLAGS = $(AM_CXXFLAGS) $(CXXFLAGS_hemi)
libhemi_plugin_la_OBJCFLAGS = $(AM_OBJCFLAGS) $(OBJCFLAGS_hemi)
libhemi_plugin_la_LIBADD = $(LIBS_hemi)
libhemi_plugin_la_LDFLAGS = $(AM_LDFLAGS) -rpath '$(video_filterdir)' $(LDFLAGS_hemi)
プロジェクトのディレクトリでconfigureとmakeを実行して完成です。
実行結果:
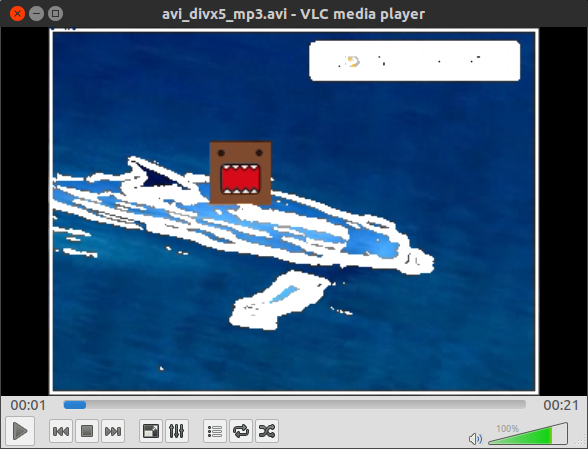
おまけ: VLC+OpenCV
さて、フィルタと言えばOpenCVですが、以前も少しだけ触れたとおり、VLCでOpenCVを使うのはちょっとテクニックが必要です。
というのも、VLCのpicture_tには色空間がYUVの場合が存在するわけですが、このために少し変換がややこしいわけです。
実は、VLCのフィルタの中にopencv_example.cppというのがあります。OpenCVを使うからには、IplImageなりcv::Matなりにpicture_tを変換する必要があるわけですが、何と、こいつによると次のように変換できるらしいんですね。
158行目
//(hack) cast the picture_t to array of IplImage*
p_img = (IplImage**) p_pic;
これはさすがにまさか嘘だろ、と思いますが、真っ赤な嘘です。
実際こいつでコンパイルするとセグフォを吐きやがります。
少しググると、StackOverflowでこのような記事を見つけることができます。こちらの記事によれば、正しいコードは以下の通りです。
//picture_t to IplImage without segmentation fault
    p_img = cvCreateImageHeader( cvSize( p_pic->p[0].i_pitch, p_pic->p[0].i_visible_lines ),
        IPL_DEPTH_8U, 1 );
    cvSetData( p_img, p_pic->p[0].p_pixels, p_pic->p[0].i_pitch );
随分まともな雰囲気が漂っていますね。IplImageを(コンストラクタのない時代なので)初期化関数によって初期化し、次にpicture_tの色情報を書き込んでいますが、いずれもp[0]のみを利用しています。
p[0]というのは、picture_tのYUVのうちYのことで、これには輝度情報が含まれています。つまり、この変換によって、p_imgにはpicture_tのもつ画像情報のうち、モノクロのデータのみがコピーされます。他の色情報(色差)は完全に欠落してしまいます。実際にimShowとかで表示させてみると分かるでしょう。
ただ、このopencv_exampleフィルタは、どうやら顔認識を行うだけのフィルタなようなので、これだけでも問題がないわけです。(僕の手持ちの動画では残念ながら本当に顔認識をしているのかは分かりませんでしたが…)
OpenCVの色認識などのフィルターを使いたければ、YUVの3レイヤー全ての情報を使わなければいけません。ただ、残念ながらIplImageは古いので、RGBしかサポートしません。cv::MatならYUVでもサポートしてくれます。正直できそうなもんですが、今回は学生実験であまり時間がないので、またの機会にすることにします。
VLC弄ってみた#2 - 時間をミリ秒にしてみる
第2回目の今回は、VLCにちょっとした改造を加えてみたいと思います。
VLCでは再生時間が秒単位でしか表示されませんが、ミリ秒単位でのシークがしたいことってありますよね。ありますよね?
そういう需要に応えるため、VLCの再生時間をミリ秒で表示させてみます。
環境はUbuntu 15.04/14.04です。MacやWindowsではGUIの描画が若干異なるため、恐らくこれだと変わりません。
どこをいじれば良いのかを探す
まずは、どこをいじれば良いのかを探す必要があります。
とりあえず描画部分のパーツを見てみることにしましょう。今回いじりたいのはシーク中の再生時間ですが、これは2ヵ所に表示されています。一つはシークバーの左端、現在の再生時間が表示されている場所で、もう一つはカーソルを合わせた際に出てくるツールチップです。
描画部分がmodule/gui/qt4あたりに入っていることは何となく分かるので、とりあえずこの中をのぞいてみると、utilの中に"timetooltip.cpp" "timetooltip.hpp"というファイルがありました。これがツールチップ情報を持った描画クラスのようです。
/* timetooltip.hpp */
class TimeTooltip : public QWidget
{
Q_OBJECT
public:
explicit TimeTooltip( QWidget *parent = 0 );
void setTip( const QPoint& pos, const QString& time, const QString& text );
virtual void show();

protected:
virtual void paintEvent( QPaintEvent * );

private:
void adjustPosition();
void buildPath();
QPoint mTarget;
QString mTime;
QString mText;
QString mDisplayedText;
QFont mFont;
QRect mBox;
QPainterPath mPainterPath;
QBitmap mMask;
int mTipX;
};
mTextというのが表示されているテキストで、setTip関数を通じてセットされていることが容易に想像できます。
ただこのクラスはパーツを定義しているだけなので、実際にsetTipしている場所を探さなければいけないですね。"timetooltip.hpp"をincludeしているファイルを検索すると、今度は同じディレクトリに"input_slider.cpp" "input_slider.hpp"というファイルが見つかりました。103行目で
/* Tooltip bubble */
mTimeTooltip = new TimeTooltip( this );
mTimeTooltip->setMouseTracking( true );
とあり、ビンゴ!ですね。
さて、実際にsetTipをしている場所を探すと、331行目に
if( likely( size().width() > handleLength() ) ) {
secstotimestr( psz_length, ( ( posX - margin ) * inputLength ) / ( size().width() - handleLength() ) );
mTimeTooltip->setTip( target, psz_length, chapterLabel );
}
という場所がありました。 secstotimestrという関数がキモのようですが、この関数はsrc/misc/mtime.cで次のように定義されています。
/**
* Convert seconds to a time in the format h:mm:ss.
*
* This function is provided for any interface function which need to print a
* time string in the format h:mm:ss
* date.
* \param secs the date to be converted
* \param psz_buffer should be a buffer at least MSTRTIME_MAX_SIZE characters
* \return psz_buffer is returned so this can be used as printf parameter.
*/
char *secstotimestr( char *psz_buffer, int32_t i_seconds )
{
if( unlikely(i_seconds < 0) )
{
secstotimestr( psz_buffer + 1, -i_seconds );
*psz_buffer = '-';
return psz_buffer;
}

div_t d;

d = div( i_seconds, 60 );
i_seconds = d.rem;
d = div( d.quot, 60 );

if( d.quot )
snprintf( psz_buffer, MSTRTIME_MAX_SIZE, "%u:%02u:%02u",
d.quot, d.rem, i_seconds );
else
snprintf( psz_buffer, MSTRTIME_MAX_SIZE, "%02u:%02u",
d.rem, i_seconds );
return psz_buffer;
}
見ての通り、秒数を受け取ってh:mm:ssのフォーマットで文字列を吐き出す関数です。なので、こいつをコピーして、millisecstotimestrという関数を作り、こちらを呼び出すようにしましょう。
実際にいじってみる
次のように関数を定義し、ヘッダファイルも編集しておきます。
char *millisecstotimestr( char *psz_buffer, int32_t i_milliseconds )
{
if( unlikely(i_seconds < 0) )
{
millisecstotimestr( psz_buffer + 1, -i_milliseconds );
*psz_buffer = '-';
return psz_buffer;
}

div_t d;
unsigned short millisec, sec;
d = div( i_milliseconds, 1000);
millisec = d.rem;

d = div( d.quot, 60 );
sec = d.rem;
d = div( d.quot, 60 );

if( d.quot )
snprintf( psz_buffer, MSTRTIME_MAX_SIZE, "%u:%02u:%02u.%03u",
d.quot, d.rem, sec, millisec );
else
snprintf( psz_buffer, MSTRTIME_MAX_SIZE, "%02u:%02u.%03u",
d.rem, sec, millisec );
return psz_buffer;
}
とりあえず、現在位置を秒数で受け取っている分にはどうしようもないので、これをミリ秒で受け取るようにします。受け取る秒は次のように計算されているのでした。
( ( posX - margin ) * inputLength ) / ( size().width() - handleLength() )
ハンドルの位置と動画の長さから秒数を計算し、これがintにキャストされています。なので、ミリ秒を取得するためにはこれを1000倍するだけで良いでしょう。
if( likely( size().width() > handleLength() ) ) {
millisecstotimestr( psz_length, ( ( posX - margin ) * inputLength * 1000) / ( size().width() - handleLength() ) );
mTimeTooltip->setTip( target, psz_length, chapterLabel );
}
動かない??
これでコンパイルを行うと、コンパイルは通りますが起動時に次のようなエラーが出ます。
VLC media player 2.2.1 Terry Pratchett (Weatherwax)
Command Line Interface initialized. Type `help' for help.
> [0000000001229228] [cli] lua interface error: Error loading script [vlc]/share/lua/intf/cli.luac: lua/intf/modules/host.lua:279: Interrupted.
[00000000011224f8] core libvlc: Running vlc with the default interface. Use 'cvlc' to use vlc without interface.
[0000000001229228] core interface error: corrupt module: [vlc dir]/modules/gui/qt4/.libs/libqt4_plugin.so
[00007f194c01f458] core generic error: corrupt module: [vlc dir]/modules/gui/qt4/.libs/libqt4_plugin.so
[0000000001229228] skins2 interface error: no suitable dialogs provider found (hint: compile the qt4 plugin, and make sure it is loaded properly)
[0000000001229228] skins2 interface error: cannot instantiate qt4 dialogs provider
[0000000001229228] [cli] lua interface: Listening on host
つまり、libqt4がライブラリとして不完全ということです。この原因を探るため、secstotimestrでgrepをかけ、millisecstotimestrとの差を見てみます。すると、なにやら怪しげなファイルにヒットします。
[vlc dir]/src/libvlccore.sym:

358 sdp_AddAttribute
359 sdp_AddMedia
360 secstotimestr
361 services_discovery_AddItem
362 services_discovery_EventManager
どうやらこのlibvlccore.symというファイルは、ライブラリに含まれるシンボルが集まったファイルのようです。 libvlccore.symで再度プロジェクト全体に対してgrepをかけてみます。すると、/src/Makefile.am内に
libvlccore_la_SOURCES = $(SOURCES_libvlc)
libvlccore_la_LDFLAGS = \
$(LDFLAGS_libvlccore) \
-no-undefined \
-export-symbols $(srcdir)/libvlccore.sym \
-version-info 8:0:0
libvlccore_la_LIBADD = $(LIBS_libvlccore) \
../compat/libcompat.la \
$(LTLIBINTL) $(LTLIBICONV) \
$(IDN_LIBS) $(LIBPTHREAD) $(SOCKET_LIBS) $(LIBDL) $(LIBM)
libvlccore_la_DEPENDENCIES = libvlccore.sym
if HAVE_WIN32
とあります。-export-symbolsオプションについてGNU libtoolのドキュメントを見てみると、確かに
-export-symbols symfile
Tells the linker to export only the symbols listed in symfile. The symbol file should end in .sym and must contain the name of one > symbol per line. This option has no effect on some platforms. By default all symbols are exported.
ということらしいです。
つまり、shared libraryでは、望まないシンボルをライブラリに含めないよう、シンボルの指定ができるということです。そのため、ライブラリに含まれないmillisecstotimestrを呼び出そうとするとエラーが起きていたのでした。なるほどなるほど。
ということで、ここにmillisecstotimestrを一行追加して再automake・コンパイルします。これでOKです。
実行結果
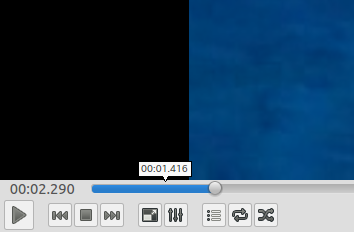
ヨッシャヨッシャ!!
Hacking the VLC - How the VLC media player works
This is a translation of my previous article from Japanese.
So, let's begin with analyzing how the vlc media player is working.
The version I used is 2.2.1, which can be downloaded from here. https://www.videolan.org/vlc/download-sources.html
Multi-Threading of VLC
Since VLC is highly multi-threaded program, I must first explain the role of each thread. The important threads to note are the following:
- Playlist: src/playlist/thread.c
- does managing of the playlist
- Video Output: src/video_output/video_output.c
- does output of the video
- Decoder: src/input/decoder.c
- does decoding of the video. Filters are also applied here.
- The drawing thread (i.e. Qt)
In fact there seems to be more than 10 additional threads running, but I couldn't follow all of them.
If you are interested in those threads, you might want to watch the function "vlc_clone", which is called every time the new thread is created. But be sure that, since VLC is designed to work on multi-platform, it depends on the device which GUI thread is actually called.
Video Processing of VLC
Whoo! Now we are ready to understand how the video is processed inside the VLC!
The video is processed in the following steps:
- The video is loaded by Playlist thread.
- The signals (Play/Stop, Pause, etc.) from GUI thread is received and processed here.
- The Decoder thread decodes the video with ffmpeg.
- The decoded frames are then pushed to picture_fifo.
- VideoOutput thread outputs the frame as decoding goes on.
- the frame is popped from the fifo.
- the process decides whether the frame should be displayed or not based on the timestamp.
This is basically all what VLC does.
The picture_fifo mentioned above is the fifo of decoded pictures. The frames are pushed in order decoded and popped when played. See picture_fifo.c for further implementations.
There is another struct similar to picture_fifo - picture_pool. This is written in picture_pool.c. It seems like it does bind some pictures or mutex-and-gc-like things. I didn't need to touch these components, so I don't know what it actually does.
Structs
There are many VLC-unique structs defined. Fortunately, today there are BUNCH of libraries floating around which make me not write these stuffs. But it wasn't that easy in 2001. These unique structures make the VLC sources very very complicated.
The astronomical numbers of structs are defined in VLC, but just let me list the ones I think are important (and interesting).
vlc_object_t: Object
Defined in vlc_common.h. The main function can be found in vlc_variables.h.
Since the VLC was developed in 2001, and maybe C++ wan't popular then, the core of VLC is written in C. But I can't imagine how hard to write such a huge program without object-oriented language.
Therefore, VLC has written all those object-oriented structures only with C. Maybe developers were too mad that they couldn't have private variables and member functions in C structs.
I guess that the developers were too happy to use those structures then, but they are slightly outdated today. Hmm...
vlc_object_t creates an object as it is given the type and the name string. The content of an object is described in vlc_value_t union as following:
/**
 * VLC value structure
 */
typedef union
{
    int64_t         i_int;
    bool            b_bool;
    float           f_float;
    char *          psz_string;
    void *          p_address;
    vlc_object_t *  p_object;
    vlc_list_t *    p_list;
    mtime_t         i_time;
    struct { int32_t x; int32_t y; } coords;

} vlc_value_t;
vlc_variables.h has many functions defined for each of the supported types. The functions are given the prefix of var_ as a namespace. All basic variables used in VLC are using this structure.
block_t, picture_t: Pictures
VLC reads the video by block, and writes by frame. block_t and picture_t are defined for these purposes.
block_t is a multi-purpose data block and defined in vlc_block.h:
struct block_t
{
    block_t    *p_next;

    uint8_t    *p_buffer; /**< Payload start */
    size_t      i_buffer; /**< Payload length */
    uint8_t    *p_start; /**< Buffer start */
    size_t      i_size; /**< Buffer total size */

    uint32_t    i_flags;
    unsigned    i_nb_samples; /* Used for audio */

    mtime_t     i_pts;
    mtime_t     i_dts;
    mtime_t     i_length;

    /* Rudimentary support for overloading block (de)allocation. */
    block_free_t pf_release;
};
As you can see, block_t is a lineare list, which can store encoding/decoding information in pts/dts. Thus, block_t is used for managing data by or transfer data in block.
It is obvious that picture_t stores a picture. The purpose of picture_t is limited to storing decoded frames, and single object itself contains enough information for displaying the picture.
/**
 * Video picture
 */
struct picture_t
{
    /**
     * The properties of the picture
     */
    video_frame_format_t format;

    plane_t         p[PICTURE_PLANE_MAX];     /**< description of the planes */
    int             i_planes;                /**< number of allocated planes */

    /** \name Picture management properties
     * These properties can be modified using the video output thread API,
     * but should never be written directly */
    /**@{*/
    mtime_t         date;                                  /**< display date */
    bool            b_force;
    /**@}*/

    /** \name Picture dynamic properties
     * Those properties can be changed by the decoder
     * @{
     */
    bool            b_progressive;          /**< is it a progressive frame ? */
    bool            b_top_field_first;             /**< which field is first */
    unsigned int    i_nb_fields;                  /**< # of displayed fields */
    void          * context;          /**< video format-specific data pointer,
             * must point to a (void (*)(void*)) pointer to free the context */
    /**@}*/

    /** Private data - the video output plugin might want to put stuff here to
     * keep track of the picture */
    picture_sys_t * p_sys;

    /** This way the picture_Release can be overloaded */
    struct
    {
        atomic_uintptr_t refcount;
        void (*pf_destroy)( picture_t * );
        picture_gc_sys_t *p_sys;
    } gc;

    /** Next picture in a FIFO a pictures */
    struct picture_t *p_next;
};
You can think of IplImage in OpenCV. Yet, picture_t has no such capability that it can be directly casted to IplImage. I won't explain the reason today, so wait for a while.
Terms
- PTS/DTS
- PTS is an abbreviation for Presentation Time Stamp, and presents the time when the frame SHOULD be played.
- DTS stands for Decode Time Stamp, which is the time the frame was decoded.
- I/P/B frame
- The idea of I/P/B frames is that the frames can be classified to 3 types, I/P/B. This method is used widely, including ffmpeg.
- Briefly explaining, there are I frames which contain all pixel information. Between I frames, there 2 types of frames, P and B, which differ in compressing level. The P frames are softly compressed and has DIFFERENCES from the previous I or P frame. B frames are hardly compressed frames between P frames, which contains complementary infomation between them. B frame can only be decoded by referencing to previous and next P frames.
- By using this method, the process can decode the frames under both slow and fast environments with a good quality. (from Wikipedia)
- decoder_synchro.c has further descriptions.
/*
 * DISCUSSION : How to Write an efficient Frame-Dropping Algorithm
 * ==========
 *
 * This implementation is based on mathematical and statistical
 * developments. Older implementations used an enslavement, considering
 * that if we're late when reading an I picture, we will decode one frame
 * less. It had a tendancy to derive, and wasn't responsive enough, which
 * would have caused trouble with the stream control stuff.
 *
 * 1. Structure of a picture stream
 *    =============================
 * Between 2 I's, we have for instance :
 *    I   B   P   B   P   B   P   B   P   B   P   B   I
 *    t0  t1  t2  t3  t4  t5  t6  t7  t8  t9  t10 t11 t12
 * Please bear in mind that B's and IP's will be inverted when displaying
 * (decoding order != presentation order). Thus, t1 < t0.
 *
 * 2. Definitions
 *    ===========
 * t[0..12]     : Presentation timestamps of pictures 0..12.
 * t            : Current timestamp, at the moment of the decoding.
 * T            : Picture period, T = 1/frame_rate.
 * tau[I,P,B]   : Mean time to decode an [I,P,B] picture.
 * tauYUV       : Mean time to render a picture (given by the video_output).
 * tau´[I,P,B] = 2 * tau[I,P,B] + tauYUV
 *              : Mean time + typical difference (estimated to tau/2, that
 *                needs to be confirmed) + render time.
 * DELTA        : A given error margin.
 *
 * 3. General considerations
 *    ======================
 * We define three types of machines :
 *      14T > tauI : machines capable of decoding all I pictures
 *      2T > tauP  : machines capable of decoding all P pictures
 *      T > tauB   : machines capable of decoding all B pictures
 *
 * 4. Decoding of an I picture
 *    ========================
 * On fast machines, we decode all I's.
 * Otherwise :
 * We can decode an I picture if we simply have enough time to decode it
 * before displaying :
 *      t0 - t > tau´I + DELTA
 *
 * 5. Decoding of a P picture
 *    =======================
 * On fast machines, we decode all P's.
 * Otherwise :
 * First criterion : have time to decode it.
 *      t2 - t > tau´P + DELTA
 *
 * Second criterion : it shouldn't prevent us from displaying the forthcoming
 * I picture, which is more important.
 *      t12 - t > tau´P + tau´I + DELTA
 *
 * 6. Decoding of a B picture
 *    =======================
 * On fast machines, we decode all B's. Otherwise :
 *      t1 - t > tau´B + DELTA
 * Since the next displayed I or P is already decoded, we don't have to
 * worry about it.
 *
 * I hope you will have a pleasant flight and do not forget your life
 * jacket.
 *                                                  --Meuuh (2000-12-29)
 */
This is how VLC can play the video on both fast and slow machines.
I will add more info if I could recall more...
VLC弄ってみた#1 - VLCの仕組み
初回の今回はVLCの内部構造について分析したことを紹介します。大学のレポートを兼ねた記事なので少し詳しすぎめに書きます。
tarballはこちらから入手でき、解析にはversion 2.2.1を用いました。
役に立つ資料
逆にこれくらいしか役に立つ資料がない…
VLCのスレッド管理
VLCは高度にマルチスレッド化されており、例えば、重要なスレッドとしては以下が挙げられます。
- Playlist: src/playlist/thread.c
- 再生リストを管理するスレッド。
- Video Output: src/video_output/video_output.c
- 動画の出力を行うスレッド。
- Decoder: src/input/decoder.c
- 動画のデコードを行うスレッド。フィルタ管理も行う。
- Qtなどの描画処理を行うスレッド。
当然、実際には音声関連やネットワーク関連など、もっと多くのスレッドが動いていますが、さすがに追いきれません。
vlcでは、スレッドの生成はvlc_cloneという関数を通じて行われます。詳しく調べたい場合はこの関数を追うと良いでしょう。
なお、VLCはマルチプラットフォームに対応しているため、スレッド管理やGUI回りでは、OSごとに違う関数が呼ばれているので注意しましょう。
VLCの動画処理
上のスレッドでも触れた4つのスレッドが、動画処理の肝となるスレッドです。
VLCが動画を処理する流れは次のようになっています。
- Playlistから動画が読み込まれる。
- GUIからの再生/停止の信号処理、再生管理はこいつが行う。
- Decoderスレッドがffmpegを利用して動画をどんどんデコードする。
- デコードされたフレームはpicture_fifoにpushする。
- VideoOutputのスレッドがDecodeと並行して動画を出力する。
- フレームはfifoからpopされる。
- この際、フレームにタグ付けられた時間情報から、出力されるべきフレームかどうかが決定される。
基本的にやっていることはこれだけです。
ここで、picture_fifoは何かというと、名前の通りデコードされた画像のFIFOです。デコードされた順にpushされ、再生する際にpopされます。実装はpicture_fifo.cに書かれています。
fifoと似た構造体に、picture_poolというものもあります。こちらはpicture_pool.cに実装があります。画像をまとめて管理したり、mutexやgc的な処理を行ったりしているような雰囲気も出していますが、残念ながらあまり直接触る機会はなく、深入りはしませんでした。
構造体
VLCでは独自の構造体が数多く定義されています。現代であれば、恐らくライブラリを使って補うような部分も、全て自前で書いてあります。これがVLCを複雑なソフトウェアにしている一因となっています。
構造体は死ぬほど定義されていますが、ここでは特によく見かける(興味深い)構造体を挙げておきます。
vlc_object_t: オブジェクト
vlc_common.hで定義されていて、主な役割はvlc_variables.hを見るとわかります。
VLCは2001年に開発されたソフトウェアで、当時はC++が主流でなかったのか分かりませんが、コアはC言語で書かれています。しかしこれだけ大規模なソフトウェアとなると、オブジェクト指向なしに記述するのは至難の業です。
そこで、VLCでは何を血迷ったか、独自でオブジェクト指向的なクラスを書き上げてしまいました。構造体ではprivateなメンバやメンバ関数が持てないので、苦肉の策として書いたのでしょう。
恐らく当時はワッショイワッショイ言いながら使われていたのでしょうが、今となっては少々使いにくいと言わざるを得ません。
vlc_object_tは型と名前の文字列などを与えられていて、実際の中身は次のようなunionで定義されるvlc_value_tです。
/**
 * VLC value structure
 */
typedef union
{
    int64_t         i_int;
    bool            b_bool;
    float           f_float;
    char *          psz_string;
    void *          p_address;
    vlc_object_t *  p_object;
    vlc_list_t *    p_list;
    mtime_t         i_time;
    struct { int32_t x; int32_t y; } coords;

} vlc_value_t;
vlc_variables.hには、それぞれの型に対応する関数がずらりと並べられていて壮観です。変数関連の関数には、名前空間としてvar_のプレフィクスが与えられています。基本的に、VLCの変数はこのオブジェクトによって管理されています。
block_t, picture_t: 画像関連
VLCでは、動画ファイルをブロック単位で読み込み、フレーム単位で出力します。そのために用意された構造体がblock_tやpicture_tです。
block_tは汎用的なブロックを表す構造体で、vlc_block.hで次のように定義されています。
struct block_t
{
    block_t    *p_next;

    uint8_t    *p_buffer; /**< Payload start */
    size_t      i_buffer; /**< Payload length */
    uint8_t    *p_start; /**< Buffer start */
    size_t      i_size; /**< Buffer total size */

    uint32_t    i_flags;
    unsigned    i_nb_samples; /* Used for audio */

    mtime_t     i_pts;
    mtime_t     i_dts;
    mtime_t     i_length;

    /* Rudimentary support for overloading block (de)allocation. */
    block_free_t pf_release;
};
見ての通り、線形リストで、pts/dts[用語解説]を含んでいるため、エンコード/デコード情報を格納することができます。これらのデータをブロック単位で管理したり、送受する場合に使われる構造体です。
picture_tは、その名の通り画像を格納します。こちらはデコード済みの画像限定で、このオブジェクト1つで画像の表示に必要な情報は全て揃っています。
/**
 * Video picture
 */
struct picture_t
{
    /**
     * The properties of the picture
     */
    video_frame_format_t format;

    plane_t         p[PICTURE_PLANE_MAX];     /**< description of the planes */
    int             i_planes;                /**< number of allocated planes */

    /** \name Picture management properties
     * These properties can be modified using the video output thread API,
     * but should never be written directly */
    /**@{*/
    mtime_t         date;                                  /**< display date */
    bool            b_force;
    /**@}*/

    /** \name Picture dynamic properties
     * Those properties can be changed by the decoder
     * @{
     */
    bool            b_progressive;          /**< is it a progressive frame ? */
    bool            b_top_field_first;             /**< which field is first */
    unsigned int    i_nb_fields;                  /**< # of displayed fields */
    void          * context;          /**< video format-specific data pointer,
             * must point to a (void (*)(void*)) pointer to free the context */
    /**@}*/

    /** Private data - the video output plugin might want to put stuff here to
     * keep track of the picture */
    picture_sys_t * p_sys;

    /** This way the picture_Release can be overloaded */
    struct
    {
        atomic_uintptr_t refcount;
        void (*pf_destroy)( picture_t * );
        picture_gc_sys_t *p_sys;
    } gc;

    /** Next picture in a FIFO a pictures */
    struct picture_t *p_next;
};
基本的にOpenCVのIplImageのようなものを想像すると良いです。 ただ、IplImageにそのままキャストできるほどの互換性はありません。これについては次回以降に詳しく説明する予定です。
用語解説
- PTS/DTS
- PTSはPresentation Time Stampの略で、動画が実際に再生されるべきタイミングを表す。
- DTSはDecode Time Stampの略で、動画がデコードされたタイミングを表す。
- I/P/B frame
- 動画ファイルのフレームを3種類に分ける。
- ffmpegなどで一般に用いられている手法。
- ざっくり言うと、全ての画像情報が含まれたIフレームの間に、圧縮率の異なる2つのフレームが存在して、Pフレーム、Bフレームと呼ばれている。圧縮率はB > Pで、Pフレームはひとつ前のPまたはIフレームからの差分を持っている。BフレームはPフレームの間を補完するための情報を持っていて、ひとつ前と後のどちらのフレームの情報も参照する。
- こうすることで、例えば極端に処理速度の遅いコンピュータではIフレームのみ、余裕があればPフレーム、Bフレームをデコードするようにすれば、スペックに応じたクオリティのデコードができる仕組みになっているらしい。(from Wikipedia)
- decoder_synchro.cに詳細が書いてある。
- 動画ファイルのフレームを3種類に分ける。
/*
 * DISCUSSION : How to Write an efficient Frame-Dropping Algorithm
 * ==========
 *
 * This implementation is based on mathematical and statistical
 * developments. Older implementations used an enslavement, considering
 * that if we're late when reading an I picture, we will decode one frame
 * less. It had a tendancy to derive, and wasn't responsive enough, which
 * would have caused trouble with the stream control stuff.
 *
 * 1. Structure of a picture stream
 *    =============================
 * Between 2 I's, we have for instance :
 *    I   B   P   B   P   B   P   B   P   B   P   B   I
 *    t0  t1  t2  t3  t4  t5  t6  t7  t8  t9  t10 t11 t12
 * Please bear in mind that B's and IP's will be inverted when displaying
 * (decoding order != presentation order). Thus, t1 < t0.
 *
 * 2. Definitions
 *    ===========
 * t[0..12]     : Presentation timestamps of pictures 0..12.
 * t            : Current timestamp, at the moment of the decoding.
 * T            : Picture period, T = 1/frame_rate.
 * tau[I,P,B]   : Mean time to decode an [I,P,B] picture.
 * tauYUV       : Mean time to render a picture (given by the video_output).
 * tau´[I,P,B] = 2 * tau[I,P,B] + tauYUV
 *              : Mean time + typical difference (estimated to tau/2, that
 *                needs to be confirmed) + render time.
 * DELTA        : A given error margin.
 *
 * 3. General considerations
 *    ======================
 * We define three types of machines :
 *      14T > tauI : machines capable of decoding all I pictures
 *      2T > tauP  : machines capable of decoding all P pictures
 *      T > tauB   : machines capable of decoding all B pictures
 *
 * 4. Decoding of an I picture
 *    ========================
 * On fast machines, we decode all I's.
 * Otherwise :
 * We can decode an I picture if we simply have enough time to decode it
 * before displaying :
 *      t0 - t > tau´I + DELTA
 *
 * 5. Decoding of a P picture
 *    =======================
 * On fast machines, we decode all P's.
 * Otherwise :
 * First criterion : have time to decode it.
 *      t2 - t > tau´P + DELTA
 *
 * Second criterion : it shouldn't prevent us from displaying the forthcoming
 * I picture, which is more important.
 *      t12 - t > tau´P + tau´I + DELTA
 *
 * 6. Decoding of a B picture
 *    =======================
 * On fast machines, we decode all B's. Otherwise :
 *      t1 - t > tau´B + DELTA
 * Since the next displayed I or P is already decoded, we don't have to
 * worry about it.
 *
 * I hope you will have a pleasant flight and do not forget your life
 * jacket.
 *                                                  --Meuuh (2000-12-29)
 */
要するに、処理速度に応じてどのフレームをデコードするかを決めているという話。
何か思い出したら書き足します。
vlc弄ってみた
大学の課題でVLC media playerをいじりました。
その結果や得られた知見を数回にわたって書いていきたいと思います。